Pages

Showing posts with label Finished. Show all posts

Tuesday, June 10, 2014

Swoon for 10 Years

Later this year we celebrate 10 years of matrimony.  We will be taking a trip back to our honeymoon destination, Hanalei Bay, Kauai.  I can't express my excitement with words!  So I thought a quilt was in order to commemorate our milestone year.  


In the process of making this Swoon Quilt I carefully selected fabrics that I love and thought went well together.  Many many fabrics were auditioned but didn't make the cut.  I wanted to steer away from my first love (reproduction prints) to what I've matured into loving (modern, bold, & bohemian prints).  I ended up with a mixture. 


Although the swoon block is very traditional, which doesn't suit the theme of our home much; I feel the prints that won my heart over give it the modern-ness we both love.  If I could go back to the beginning I think I would still use the traditional swoon block, but in a more modern approach, like maybe only a few down one side of the quilt, kind of the way Denyse Schmidt does it in her quilt pattern Point Me.  

Mostly I love this quilt in parts, like each individual block, binding/backing fabric which is Drop Cloth by Jay McCarroll, and the hand stitches.


I hand quilted it, which felt like it took forever.  I knew in the end I'd love the effect, which I do.  As you can see it isn't perfect.  One thing that bugged me at first was the subtle difference in whites.  The saching was a second order of Kona Cotton in Snow.  Now I don't mind it so much.  I actually like it!


The size fits perfectly with our bed frame, which is incredibly hard to tuck anything into, even a sheet, but covers us perfectly.  

To sum up my fabrics I used prints from Denyse Schmidt, Jay McCarroll, Anna Maria Horner, Juliana Horner, Joel Dewberry Martha Negley , Pat Bravo , Carrie Bloomston, Heather Bailey and Amy Butler.  Solids were Kona Cotton in Snow, and Aqua.


This corner is the first I see when I walk in the room.  It's my favorite!

>>---Lindsay--->

Earlier posts on this quilt: Swoon Blocks, Just Swooning Along, Lately

Monday, April 21, 2014

Before & After

Just in time for Easter, I refinished and painted this cute little children's table and chair set.  I barely remembered to snap a before shot.  Here it is with a little bit of sanding already done.


 And here is the lovely new to me set.  I'm in love! 


 I used the same cherry gel stain from refinishing the Lane tables a couple years ago.  And the paint I used was a spray paint + primer by Valspar in Dune.  I was the perfect creamy white.


Just as we all do, this table was destined for new life!   Amen!

Lindsay


Tuesday, March 25, 2014

Flying Geese Quilt

I've completed my Flying Geese Quilt.  It's actually been finished since mid February, but I'm just now getting around to photographing it and posting about it.  


Isn't it divine?  I haven't free-motion quilted in 4 years because I almost always have tension problems.  Nothing has changed with the machine since then that I know of.  I really wanted to free motion this one.  So I tested the machine again and it was decent.  So I went for it.


The quilting is far from perfect, but I like it that way.  Although its size made it tough to manage it was more than I expected it to be as my second attempt in 4 years at FMQ(free motion quilting).  Of course the Denyse Schmidt figure eight loops were my inspiration.  She is such a trend setter.  I used a black Aurifil thread for the quilting and it was much smoother than the Coats and Clarks quilting thread I've been buying.  I just may be hooked on Aurifil now.   


Here it is all layed out (poor photo quality - sorry).  As you can see I added some boarders to add length.  We like long throw quilts in this house.  Must expand from husband's neck to over the his toes.  


It never looks like this.  Neatly folded that is.


More like this...as a fort.  Of course its my new favorite too.

Quilt Stats:
51" x 76"
Fabrics: Jelly Roll of Chicopee, and scraps from Greenfield Hill.
Both by Denyse Schmidt


You may barely notice my two new photos above the mantel.  They are new, and dreamy.  I'm finally at peace with my mantel set up.  I got them from here. 

Lindsay


Friday, March 14, 2014

Little Man Cuddle Quilt

My son has been asking me for a quilt for a while.  A soft quilt, meaning plush.  My girl friend, Christine Adolph gave me a stash of her line from a couple years ago.  Its was perfect for him.  Skateboards and BMX bikes.    


I cut 6" squares and quilted it in the ditch.  Quilting minky fabric was a first for me, but it was quite easy.  I love these boy colors.  The rust orange marble is my favorite.  


He picked out the back. 


Which happens to match our vintage chairs perfectly.  Wonder if he thought of that when he chose that color?


I sewed as quickly as possible and now he enjoys it daily.  Don't mind the messy pink hair.  It was crazy hair day today;D


Monday, September 23, 2013

Vintage Butterflies :: Two Finished Quilts

Today I finished binding my second Vintage Butterflies Quilt. Isn't she lovely?

I just love Christine Adolph's use of pastels with bright blues and pinks in her Vintage Butterflies line! This collection is truly dreamy.

I've listed this one in my Etsy Shop. You can see the listing here. Which reminds me, I forgot to share and add the first one to my shop. Ooops!
The first Vintage Butterflies Quilt I made using the fabulous Granny Square tutorial from Blue Elephant Stitches. Its such a cute pattern and so easy for using up stripes of fabric, which in this case I had pleanty of. I had already cut out my charm squares for the quilt at the top, but let the stack just sit because I was anxious to make the Granny Square quilt first. Funny how inspiration suddenly thwarts all current tasks.

I really enjoyed pieceing the Granny Square quilt. It has that traditioinal patchwork vibe, but on point. I added texture to this one using a pearl cotton to hand quilt around the outer boarder of each block. I love how it turned out.

My Vintage Butterflies Granny Square Quilt is also listed in my Etsy Shop, and you can find the listing here.

The Granny Square quilt pattern by any means isn't a new pattern. Actually its been around a while. I saw this one in A Treasury of Amish Quilts by Rachel & Kenneth Pellman. It's dated circa 1895 from Lancaster County, Penn. and titled as 'Multiple Patch in Bars'.

And this one from The Amish Quilt by Eve Wheatcroft Granick. Its dated circa 1920-30 also from Lancaster County Penn. and is titled in the book as 'Album Patch'.

I just love looking back at history and seeing how trends get reinvented and brought back to life, don't you?

Thanks for stopping by!

>>----Lindsay---->


Monday, July 29, 2013

Churn Dash :: Finished Quilt

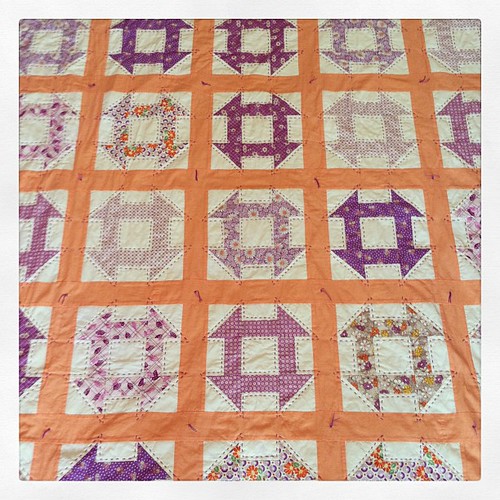
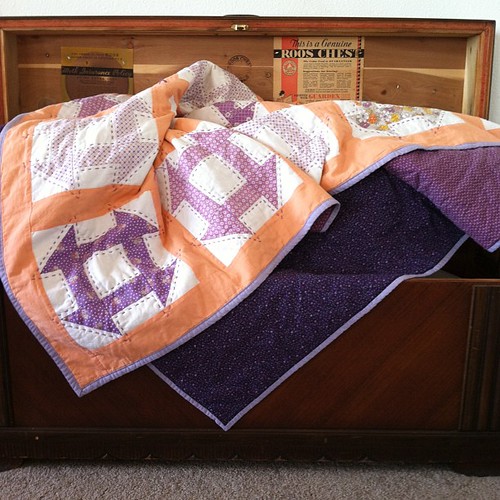
Just pulled this beauty out of the dryer. It crinkled up so nicely, don't you think?

I chose to hand tie this one as well as echo stitch with chunky pearl cotton around each block. It turned out so darling. I think the quilting added to its vintage appeal.

The quilt consists of several lavender, violet, and peach reproduction prints I purchase a few years ago on vacation in Montana. I picked up the Kona Cotton solid in peach at a store closing sale. I didn't have a vision for this fabric stash until I purchased Denyse Schmidts' book Modern Quilts Traditional Inspiration. Remember this post?

So this is pretty much how things are going today. Two finished quilts, my feet are up, and I'm watching a new movie with my little Boo! I'll get to sharing about the Granny Square quilt in a couple days.

The Churn Dash Quilt has been listed in my Etsy shop. You can see it here. Thanks for visiting.

Lindsay


Monday, April 15, 2013

Settling In

Oh how I've missed you guys.  Man a month has flown by with business.  Thankfully I can now say, life is back to normal.  Well at least a new normal!  Sadly the only boxes left to unpack and organize are my fabrics.  Selfishly I would have unpacked them first, but if you know me, I'd never sleep until my house, especially the kitchen is in order.  Two hungry boys depend on me for food.  Soon I hope to share with you pictures of our new home, but I haven't picked up our new couch yet, and my walls are naked.  So stay tuned...

I did manage to meet one of my 'before I move' goals.  A finished a quilt.  Not just any quilt, but one for my mother. 

 Freedom Quilt

She received it at her birthday dinner at the end of March and has mentioned more than a few times how much she loves it.  I still can't believe it took me this long to make her a quilt.  She has been high on my priority list, but I had to collect the perfect fabrics over time.  She was worth the wait and I'm so happy with the combination that unfolded.


Please pardon the picture quality.  It really doesn't do the quilt justice.  The FREE pattern/tutorial I used was Starry Eyed by Angela of Fussy Cut.  Its was an easy tutorial and I thought the star theme went really well with my Red, White and Blue selection of fabrics.  

This here is my favorite block because I managed to add a piece of Anna Maria Horner into the center.  This small piece of fabric was a swatch thrown in with an fabric bundle I received a while back.  I kept it on top of my growing fat quarter stash for my mother's quilt for inspiration.  In this quilt, it adds a fireworks kind of effect. 


You may have noticed I used a bit of Bliss by Bonnie & Camille, as well as a very large variety of DS Quilt fabrics and a few reproduction prints from Darlene Zimmerman and P&B Textiles.  But my ultimate favorite was that I was able to use the Holly Hobbie-ish fabric as my white background.  It was the perfect low volume print.  This print I picked up at JoAnne Fabrics, oh gosh, I don't know.  Maybe 8 years ago.  I had 3 yards on hand so I had just enough for this large throw quilt.  I think it was the perfect touch, don't you?


For the back I scored on the clearance rack both DS Quilt prints for only $6/yard...and then I did a center scrap strip to join the two together.  It was really fun to design the pieced quilt back.  

For the quilting I don't have a detailed shot, but in case you are interested I used my walking foot to quilt in the ditch.  I quilted in the ditch between every print and the white background, including every star.  It was a serious trying of my patience, kind of test.  But the end result was just what I was hoping for.  


Well I'll be back hopefully soon to share some pictures of my sewing corner all set up.

xo,

Lindsay


Saturday, March 2, 2013

Lane Acclaim Tables

I've done it!  All by myself too...,  I've successfully refinished my two Lane Acclaim end tables and extra long coffee table.  


After 2.5 years of sanding, I made a run for it and devoted the last three weeks to sanding like a tweaker (wink wink - Jill).  I've read a ba-gillion blogs and how to-s on refinishing these same exact tables.  These Mid-Century Lane Acclaim tables are known for their two-tone colors, the intricate dovetail detail of the white oak and the lovely grain of the dark walnut.  Beautiful!

If you care to know the technique I used please read on, or just enjoy the pics!  

First a I stripped the tables using Jasco.  Wish I'd watched a few tutorials on this ahead of time.  The legs were a so frustrating to remove the Jasco/stain goo off.  I recommend using a stotch pad soaked in Mineral Spirits on rounded surfaces.  I scraped the flat surfaces with a plastic scraper.  Then I sanded using a hand sander with 150 grit sandpaper most of the time.  I also used a few sanding sponges for the hard to reach grooves.  This didn't work all that well.  They have a little too much give and get chewed up easily, not to mention cost too much.  I needed something with more pressure, but didn't know anything out there existed.  This is what took forever.  I hated the legs and wished I had not stripped them and just focused on the table tops.  Oh well.  After all is said and done I found a sanding block at Lowes the other day and wished I'd known it existed before.  It has a rounded side and angled side to it.  You can attach any grit paper.  Its GENIUS!  I bought it and plan to use it in the future.  Lord help me if I'm ever gonna do this again?!

After multiple trips to Lowes, I selected the Minwax Gel Stain in Cherrywood.  The hub online I found was to leave them either natural or go with a walnut stain.  I knew right away that I didn't love the high contrast of the two woods.  I like the original contrast where the white oak is brought down into the browns a little.  So I tried a walnut stain first, but found it looked a little dirty old brown.  Not at all what I was hoping for.  I wanted something with a hint of red.  So Cherrywood it was. 

Then I chose a Minwax Waterbased (Oil-Modified) Polyurathane in Satin finish.  I used several cheap sponge brushes, suggested by my father-in-law and I recommend it too.  The bristle brushes leave streaks and cost a pretty penny.  The satin finish is perfect, which I also love.  It doesn't have too much of a glare.  I hate glares/sheens on woodgrain.  It distracts away from the grain.  I know I sound like a man, ha!  Wooood  Graaaain!!!  But, I do, I love the wood grain.  Crisp white paired with wood grain... its a lovely combination.

As for this baby:  the coffee table, well, lets just say it has lots of personality.  I knew diving into this project that this table would never be what it once was.


My husband discovered that these lovely black stains in the wood grain were not surface level just hours after we purchased them.  There is also a large water ring on the other end, probably form a house plant.  He abandoned the refinish project, but still brought them home for me.  I guess the furniture designer in him, just couldn't bare to have such a blemished project.  Sadly I had already fallen for the whole set and wasn't willing to part with them.

I saved the coffee table for last.  Actually I should give the table a little more credit.  It did turn out a lot better than I thought it would.  I stained and re-stained the walnut several times till I was somewhat happy with the evenness of the color.  It was a lot blotchier before.  For whatever reason it just didn't stain evenly like the end tables.  Honestly the coffee table is gonna get a lot more blemishes in this house.  I need a coffee table I can put my feet on, if you know what I mean.  And I've got a 4 yr old boy who will most likely be landing airplanes on it and racing matchbox cars across it.  Can't you just see it now?  Its the perfect run way, right?

Onto other news...we found out we need to move this month.  Our landowner recently sold this house to his daughter, but before I get deep into packing.  I'll be back with a quilt to share with you as soon as I finish binding it and photographing it.  

Thats two more things off my NEW list for 2013.  Yeah me!

xo
Lindsay

Monday, December 31, 2012

2012 Finished Projects

Just thought I'd give an overview of all the projects I've completed in 2012.  Or at least the ones I've photographed.  I love doing this at the end of the year.


For example, I sadly didn't get a finished photo of the Aviary 2 Quilt (item #9 above) before I shipped it.  And it was my first custom quilt order too.  Duh-me!  

And I don't think I ever showed this finished embroidered pillow I made my sister for her birthday.  Isn't it lovely?  It was so fun to make.  Quick and fairly easy, except those little french knots.  I've got to practice those a bit more.  It was my first time using a transfer pattern.  I used the "Flower of the Month" pattern by Aunt Martha's Colonial Patterns, Inc.  You can purchase them at any Joanne's or Hobby Lobby here in the States.  The pillow is 12"x16" and I framed the linen center using some reproduction print I had on hand.  My use of linen was inspired by Amy of Nana & Co.  She makes the sweetest pretty little things.  Since I didn't find a Flickr group for Aunt Martha's Embroidery I started one.  Please  join in if you have any to share.

Of course you probably already saw this shirt from my last post, but just thought I'd add it to this one to cover all of 2012 as best I can.


Ok sadly, there are a few more I items I didn't photograph, ie: zippered pouches, a couple aprons to name a few.  And a couple unfinished projects that will hopefully get finished in the new year.  One of my new year's resolutions is to take more pictures ;D

Have a Happy New Year!

Lindsay

Wednesday, December 26, 2012

Success

Well, after a lot of hours, I have successfully made my husband a shirt, which he received on Christmas morning. And he didn't know I made it until I told him. He was so blessed.

I used a navy and light blue plaid from DS Quilts for Fabric Traditions at Joann's.  Unfortunately its a bit big in the mid section.  I probably should have made him a shirt in muslin first.  This is a true men's large.   My hubby has the shoulders and long arms that require a large, but his mid section will never fill this out.  Don't know what to do with it now.  It was the thought that counts...

Today I'm a little under the weather.  So just hanging at home with the little man of the house.  I have been slowly working away at my Red, White, and Blue quilt.   My head is so stuffy its hard to concentrate, but these fabrics seem to lift my spirits.  There are so many of my favorites in here.
Hope you had a good Christmas.

xo,
Lindsay


Tuesday, September 25, 2012

Charming Chevron :: A Finished Quilt

Hi!!!  I'm back.  Well, actually I've been sewing away here, just haven't joined in blog land in a while.  Its been a nice break, but its time for some sharing...  

Here is the Charming Chevron quilt all finished up.


Its been finished for a while, but I waited to share it because I didn't want my niece to see it before I gave it to her.  Sunday was her golden birthday.  Have you ever heard of that?  Its when you turn the same age as the number of your birth-date.  In her case, she turned 23 on the 23rd.   

This quilt is just a small throw and I used 6" charms to complete it.  For the backing and binding I used the a turquoise flat sheet I had on hand and never used.  I think using flat sheets is a great way to back large quilts.  No piecing and it all one piece of cloth.  Sooo much easier.  


I created a tutorial to make this block.  You can see my tutorial here.  I opted to make all the blocks point the same direction rather than alternating them each row.  I like how it turned out.  And the recipient was in love with it.  So glad she was too!  

More sewing updates coming soon!

Lindsay

Thursday, July 12, 2012

Week Away :: Completed

I've just returned from a wonderful trip to Baja California.  It was very relaxing as I read a few Amish romance short stories. I know silly, but I haven't read anything good since Hunger Games.  The Amish romance novels are actually quite good.  I've been enjoying the Jacob's Daughter series by Samantha Jillian Bayarr on Amazon.  The kinde edition is only $1.99 each.  Can't wait till the next one is released.  Anyway, I also took a few hand sewing projects with me on my trip.  


I received a crochet edged flannel blanket when I had Jack and have thought about it for three years.  Then I stumbled across a pin on Pintrest for a cute pillowcase crochet edge tutorial by You Go Girl.  Needless to say I ran to Joann's bought the flannel and the yarn from Michael's.  I am so not impressed with the flannel selection at Joann's but I didn't have time to order any.  This was truly the only print I liked.  Then when I went to pick out the Crochet yarn they only had white and off white in size 3.  Weird.  So I went to Michael's Craft store and they had several colors to choose from.  Thankfully, I had a baby in mind who was actually born yesterday.  It's already on its way to wrap around her.  


Also got a few more Hexagons done.  19 to be exact.  Finally get to update that little Hexagon counter in my side bar.  Paper piecing truly is a good traveling sewing project.  When I can't take the machine with me that is.

  
Now I have 69 hexagons completed and a few flowers are being arranged.  Aren't they fun?


Ooo, and I could hardly wait to get home and open this Vintage Amish Children embroidery transfer pattern.  I bought it on Ebay just before we left for Baja and now I can't wait to try out the hand embroidery stitches. I was practicing on my vacation as well.  Sorry too boring of a picture to show you my practice stitches.  But I do promise to share as I work on these in the future.  I didn't know about Aunt Martha's patterns until recently and I think I'm gonna love doing them.  Any of you ever tried these patterns?  I looked on Flickr and didn't find a group, so I've started one.  Join in if you'd like.  Patterns are under $2 at JoAnns.